阅读SpringBoot源码的心得记录

博主原创文章,转载请说明出处,但是不说我也管不了你🏳️

前言

前几天在写SpringBoot启动类的时候,本来是要在启动类上加@MapperScan注解的,结果写成了@ComponentScan注解,随后在启动SpringBoot项目的时候发现所有的Bean都没有加载到容器里,当时也是纳闷了一小会儿才发现是注解写错了,导致@ComponentScan注解与@SpringBootApplication注解冲突了,导致@SpringBootApplication默认的包扫描全部失效了,所以容器才没法加载Bean。

之后我也是好奇为啥会这样,想知道@ComponentScan@SpringBootApplication的关系以及@SpringBootApplication默认的包扫描到底是啥样的,于是我便看了看注解的相关源码,一下子就想明白了,一边感慨规范的代码看起来确实爽(比吃完泻药都畅通),一边也觉得学会阅读他人的源码或者文档是一件很重要的事,特别是一些小众的项目,网上相关前辈的经验寥寥无几,只能依靠自己去一点一点阅读官方文档甚至源码,所以在此记录一下我解决问题的过程。

本文将以@ComponentScan@SpringBootApplication冲突的问题为基础,详细记录一个小白应该如何通过源码阅读来理清这个问题的根本原因。

(其实我现在相关的阅读能力也很弱,特别是英文文档,虽然一直在训练自己英文文档阅读能力,但是仍然还是无法像阅读中文文档那样有”回到家“的感觉,有的时候读一个长难句就像便秘一样难受,服了。)

正文

1. 问题引出

1.1 问题描述

源码如下所示:

JAVA
1
2
3
4
5
6
7
8
9
@ComponentScan("com.brutik.mapper")
@SpringBootApplication
public class Main {

public static void main(String[] args) {
SpringApplication.run(Main.class,args);
}

}

项目目录结构如下:

项目目录结构

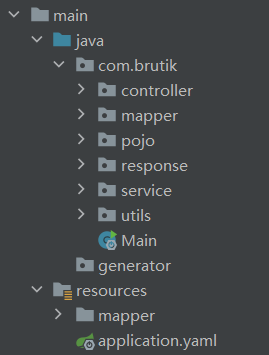
随后启动SpringBoot项目,但是通过规定地址访问项目内容时却均返回404 not found

返回未找到资源错误

1.2 问题排查与解决

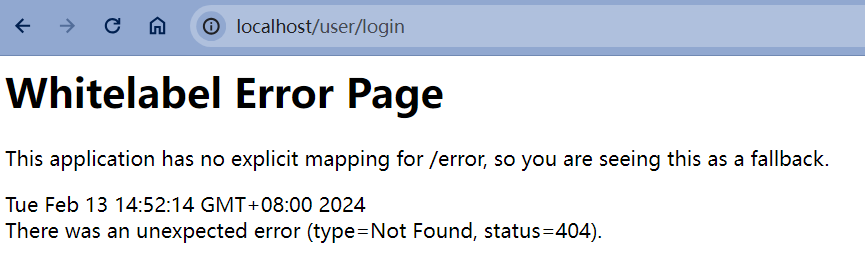
经过反复确认访问地址没有问题后,再查看SpringBoot自己的日志打印,发现啥也没有,也就是说明代码和环境也没有问题,那么就可能是自己的逻辑写错了。而返回404的内容又是This application has no explicit mapping for /error,遂推断可能是Controller的Bean根本就没有被加载到容器里,才导致地址没有映射,故开始验证猜测。使用idea自带的工具查看Spring容器里的Bean对象:

已加载的Bean对象列表

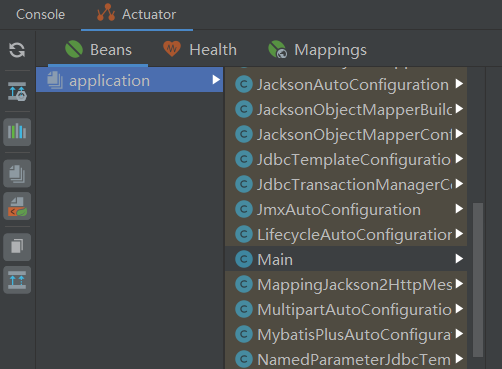
发现只有一个自己写Main被加载了,所以猜测是对的。而Bean没被加载一般都是包没有扫描的问题,而我只在Main类上写了扫描包的注解,最后问题解决:@MapperScan注解错写成了@ComponentScan注解

2. 问题深究

所以为什么加了@ComponentScan会使得@SpringBootApplication扫描包的功能失效呢?只能猜测可能@SpringBootApplication优先级更低,有了@ComponentScan@SpringBootApplication就被覆盖掉了,而为了验证这个猜想可以通过阅读官方文档或者源码搞懂@SpringBootApplication注解到底干了啥来解决这个疑问。

2.1 源码阅读

首先得强调一点,许多问题其实根本不需要我们去阅读源码特别是像SpringBoot这种体量大、社区活跃度高、使用量也是多得离谱的项目。因为第一,SpringBoot也算是比较复杂的项目了,有的部分靠自己去看源码可能得花大量时间;第二,这种很活跃的项目其实有很多的讲解教程,看大佬们的讲解比我们自己搁那慢慢研究效率会快很多且能学得更深刻。所以看这种类型项目的源码更多其实也是为了学习源码的规范或者是强化自己的代码阅读能力又或者是为了面试(doge)。下面开始进入正文。

既然是阅读源码,肯定需要一个阅读源码的工具(如果现在还有狠人用记事本看代码敲代码的,那确实是牛逼),而idea无疑是一个很强大的源码阅读工具,各种继承关系、调用关系都可以通过idea看得很清楚。本文也是使用的idea。

Ctrl+鼠标左键查看@SpringBootApplication的注解源码声明(为节省篇幅,部分代码不重要的内容会省略后同):

JAVA
1
2
3
4
5
6
7
8
9
10
11
12
13
14
15
16
17
18
19
20
21
22
23
/**
* Indicates a {@link Configuration configuration} class that declares one or more
* {@link Bean @Bean} methods and also triggers {@link EnableAutoConfiguration
* auto-configuration} and {@link ComponentScan component scanning}. This is a convenience
* annotation that is equivalent to declaring {@code @Configuration},
* {@code @EnableAutoConfiguration} and {@code @ComponentScan}.
*
* @author Phillip Webb
* @author Stephane Nicoll
* @author Andy Wilkinson
* @since 1.2.0
*/
@Target(ElementType.TYPE)
@Retention(RetentionPolicy.RUNTIME)
@Documented
@Inherited
@SpringBootConfiguration
@EnableAutoConfiguration
@ComponentScan(excludeFilters = { @Filter(type = FilterType.CUSTOM, classes = TypeExcludeFilter.class),
@Filter(type = FilterType.CUSTOM, classes = AutoConfigurationExcludeFilter.class) })
public @interface SpringBootApplication {
//...
}

注释翻译:指明一个配置类,该类声明一个或多个@Bean方法并触发自动配置和组件扫描。这是一个方便的注释,相当于声明@Configuration@EnableAutoConfiguration@ComponentScan

当然,从代码中可以看出,实现@SpringBootApplication功能的关键注解是@ComponentScan@SpringBootConfiguration@EnableAutoConfiguration。而这里的@ComponentScan就只是为了让两个重要的类不被扫描,故只考虑另外两个到底是干嘛的。

先看@SpringBootConfiguration

JAVA
1
2
3
4
5
6
7
8
9
10
11
12
13
14
15
16
17
18
19
20
21
22
/**
* Indicates that a class provides Spring Boot application
* {@link Configuration @Configuration}. Can be used as an alternative to the Spring's
* standard {@code @Configuration} annotation so that configuration can be found
* automatically (for example in tests).
* <p>
* Application should only ever include <em>one</em> {@code @SpringBootConfiguration} and
* most idiomatic Spring Boot applications will inherit it from
* {@code @SpringBootApplication}.
*
* @author Phillip Webb
* @author Andy Wilkinson
* @since 1.4.0
*/
@Target(ElementType.TYPE)
@Retention(RetentionPolicy.RUNTIME)
@Documented
@Configuration
@Indexed
public @interface SpringBootConfiguration {
//...
}

可以从注释中看出,这个注解其实就是用来代替@Configuration注解,套了这么多层娃,结果其实就是为了改一个名字,虽然可读性变好了,但是捏,不好说。

再来看@EnableAutoConfiguration

JAVA
1
2
3
4
5
6
7
8
9
10
11
12
13
14
15
16
17
18
19
20
21
22
23
24
25
26
27
28
29
30
31
32
33
34
35
36
37
38
39
40
41
42
43
44
45
46
47
48
49
50
51
/**
* Enable auto-configuration of the Spring Application Context, attempting to guess and
* configure beans that you are likely to need. Auto-configuration classes are usually
* applied based on your classpath and what beans you have defined. For example, if you
* have {@code tomcat-embedded.jar} on your classpath you are likely to want a
* {@link TomcatServletWebServerFactory} (unless you have defined your own
* {@link ServletWebServerFactory} bean).
* <p>
* When using {@link SpringBootApplication @SpringBootApplication}, the auto-configuration
* of the context is automatically enabled and adding this annotation has therefore no
* additional effect.
* <p>
* Auto-configuration tries to be as intelligent as possible and will back-away as you
* define more of your own configuration. You can always manually {@link #exclude()} any
* configuration that you never want to apply (use {@link #excludeName()} if you don't
* have access to them). You can also exclude them via the
* {@code spring.autoconfigure.exclude} property. Auto-configuration is always applied
* after user-defined beans have been registered.
* <p>
* The package of the class that is annotated with {@code @EnableAutoConfiguration},
* usually via {@code @SpringBootApplication}, has specific significance and is often used
* as a 'default'. For example, it will be used when scanning for {@code @Entity} classes.
* It is generally recommended that you place {@code @EnableAutoConfiguration} (if you're
* not using {@code @SpringBootApplication}) in a root package so that all sub-packages
* and classes can be searched.
* <p>
* Auto-configuration classes are regular Spring {@link Configuration @Configuration}
* beans. They are located using {@link ImportCandidates} and the
* {@link SpringFactoriesLoader} mechanism (keyed against this class). Generally
* auto-configuration beans are {@link Conditional @Conditional} beans (most often using
* {@link ConditionalOnClass @ConditionalOnClass} and
* {@link ConditionalOnMissingBean @ConditionalOnMissingBean} annotations).
*
* @author Phillip Webb
* @author Stephane Nicoll
* @since 1.0.0
* @see ConditionalOnBean
* @see ConditionalOnMissingBean
* @see ConditionalOnClass
* @see AutoConfigureAfter
* @see SpringBootApplication
*/
@Target(ElementType.TYPE)
@Retention(RetentionPolicy.RUNTIME)
@Documented
@Inherited
@AutoConfigurationPackage
@Import(AutoConfigurationImportSelector.class)
public @interface EnableAutoConfiguration {
//...
}

一来就看到个关键字:@AutoConfigurationPackage里面的package,到这一步也基本上就确定这个注解就是用来自动配置包扫描的注解了。但是从注释的这句话:It is generally recommended that you place @EnableAutoConfiguration (if you're not using @SpringBootApplication) in a root package so that all sub-packages and classes can be searched.意为:通常建议您将@EnableAutoConfiguration(如果您没有使用@SpringBootApplication)放在根包中,以便可以搜索所有子包和类。可以看出这个注解可以让配置类所在包下的子包以及类加入被扫描的队列。

再看@AutoConfigurationPackage这个注解:

JAVA
1
2
3
4
5
6
7
8
9
10
11
12
13
14
15
16
17
/**
* Registers packages with {@link AutoConfigurationPackages}. When no {@link #basePackages
* base packages} or {@link #basePackageClasses base package classes} are specified, the
* package of the annotated class is registered.
*
* @author Phillip Webb
* @since 1.3.0
* @see AutoConfigurationPackages
*/
@Target(ElementType.TYPE)
@Retention(RetentionPolicy.RUNTIME)
@Documented
@Inherited
@Import(AutoConfigurationPackages.Registrar.class)
public @interface AutoConfigurationPackage {
//...
}

注释中的一句话:When no base packages or base package classes are specified, the package of the annotated class is registered.,翻译出来就是:当基包或者基类没有被指定时,包中被用此注解的类就会被注册生效。基包或者基类就是指要被容器扫描注册的包或者类。

所以总算找到了答案:只要使用了@ComponentScan注解并加上参数,则就指定了基包或基类,这样会导致@AutoConfigurationPackage不会生效,也就是优先级问题。不过还是好奇是怎么实现包扫描的,从上面可以看出最终的功能实现是靠AutoConfigurationPackages.Registrar.class这个类。

再看AutoConfigurationPackages.Registrar.class

JAVA
1
2
3
4
5
6
7
8
9
10
11
12
13
14
15
16
17
/**
* {@link ImportBeanDefinitionRegistrar} to store the base package from the importing
* configuration.
*/
static class Registrar implements ImportBeanDefinitionRegistrar, DeterminableImports {

@Override
public void registerBeanDefinitions(AnnotationMetadata metadata, BeanDefinitionRegistry registry) {
register(registry, new PackageImports(metadata).getPackageNames().toArray(new String[0]));
}

@Override
public Set<Object> determineImports(AnnotationMetadata metadata) {
return Collections.singleton(new PackageImports(metadata));
}

}

注释写得很明白:该类用于存导入配置中的基包值。而从类中的方法里可以看到实际是PackageImports这个类负责获取基包名。

再看PackageImports

JAVA
1
2
3
4
5
6
7
8
9
10
11
12
13
14
15
16
17
18
19
20
21
22
23
24
25
26
27
28
29
30
31
32
33
34
35
36
37
38
39
40
41
42
43
/**
* Wrapper for a package import.
*/
private static final class PackageImports {

private final List<String> packageNames;

PackageImports(AnnotationMetadata metadata) {
AnnotationAttributes attributes = AnnotationAttributes
.fromMap(metadata.getAnnotationAttributes(AutoConfigurationPackage.class.getName(), false));
List<String> packageNames = new ArrayList<>(Arrays.asList(attributes.getStringArray("basePackages")));
for (Class<?> basePackageClass : attributes.getClassArray("basePackageClasses")) {
packageNames.add(basePackageClass.getPackage().getName());
}
if (packageNames.isEmpty()) {
packageNames.add(ClassUtils.getPackageName(metadata.getClassName()));
}
this.packageNames = Collections.unmodifiableList(packageNames);
}

List<String> getPackageNames() {
return this.packageNames;
}

@Override
public boolean equals(Object obj) {
if (obj == null || getClass() != obj.getClass()) {
return false;
}
return this.packageNames.equals(((PackageImports) obj).packageNames);
}

@Override
public int hashCode() {
return this.packageNames.hashCode();
}

@Override
public String toString() {
return "Package Imports " + this.packageNames;
}

}

重点关注其构造方法,可以看到构造方法里先是尝试从@AutoConfigurationPackage注解的元信息中获取基包值,并作了个判断,如果没有获取到就使用注解所在包作为基包。至于怎么判断@ComponentScan是否存在的具体方法,经过查找应该是在AutoConfigurationImportSelector类中定义的,不过我也不想看了,因为各种类名、方法名太长了,看得我眼睛疼,意思意思就行了。

3. 总结

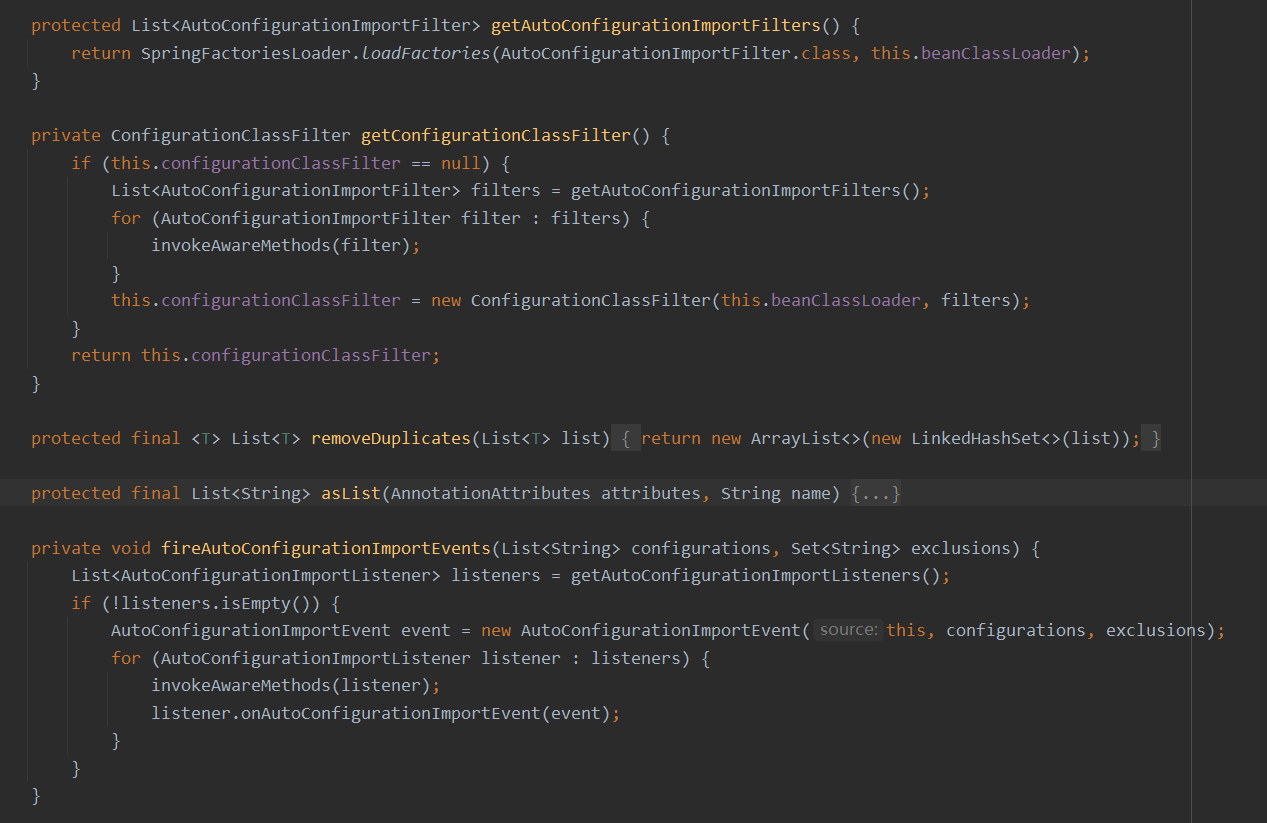
从以上可以看出,如果你头铁直接去读源码,其实也没多少技巧,就是靠注释再结合各种类名、方法名去理解甚至去猜测源码的具体意思,如果遇到一些写得烂的代码,这个时候估计得开始咒作者全家了,因为基本上只能去嗯猜,全靠自己的经验。其实SpringBoot的源码在我的角度也只是一些关键的地方注释写得非常清楚明白,但是在一些不重要的方法或者类上也是看得人脑壳疼,一些类名或者方法名真的是又臭又长,比如:getAutoConfigurationImportListeners这种,来一两个还好,但是满屏都是这种是真的英语非母语者不友好,看得人眼睛是真的疼,虽然表达的意思清晰明了,但是信息密度太低了,来张图感受一下:

眼睛疼

以上缺点我感觉也无解,要么就用缩写,更让人崩溃。不过好在每个方法代码长度都很短,很符合Robert C. Martin那老计说的“代码整洁艺术”,只要代码长度短,写得再烂也容易读懂。

所以,放弃头铁,不要动不动就去读源码,有这精力去研究官方文档或者各路为爱发电的大神出的各种博客文章,早出师了,比读源码强一万倍,除非要去学习代码的各种命名规范、继承关系的逻辑等等,否则源码?狗都不看!

好困,写不动了,睡觉。